ASP.NET Core and #Angular Forms: get() vs. controls collection

When using reactive forms in Angular, you can access the form control via the get or the controls collection

These two return the same structures and data.

myForm.get('name')
myForm.controls['name']
myForm.controls.name

Which to use?

The Get() call is a getter and as such will probably be safer for longer. The Controls[] is a bit faster, so if you use it, store the value to display in a Component field to bind in the UI.

The get() is better suited to a complicated situation; think multi-layer nested controls. This lets you more easily access control.control.control nestings.

To access a nested control these two are functionally identical.

myForm.get('nation.0');
myForm.controls.nation.controls[0];

Bonus Points:

Here’s a great explanation about performance you may wish to consider. But if your page is moderate, your users won’t notice the difference.

More:

Have a look at the new Type Forms in Angular, there are lots of goodies there.

ASP.NET Core User Secrets for Multiple Development Configurations (AppSettings.json’s)

user secrets in asp.net core

A User Secret is a json file on your development computer which contains connection strings and passwords you don’t want to include in your source code. ASP.Net Core will automatically update the appsettings.development.json with values from the secret.json.

How do you handle multiple appsettings.json development files?

appsettings.development.json
appsettings.uat.json

Here’s the absolute most simple way to get started

Step 1: Create the 2 secrets.json Files

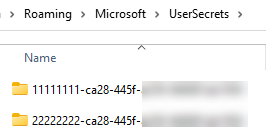
Go to %APPDATA%\Microsoft\UserSecrets and create 2 folders. The folders must be GUIDs. Doesn’t matter what GUID.

Step 2: Add the file “secrets.json” into each folder.

In these files include your secret settings like this: (Notice the colons indicating parent/child settings from your appsettings.json)

Step 3: Tell program.cs about these folders:

	public static void Main(string[] args)
	{
		CreateHostBuilder(args)
			.ConfigureAppConfiguration(
				(hostContext, builder) =>
				{
					//User Secrets hold the connection string info
					//Found in %APPDATA%\Microsoft\UserSecrets
					if (hostContext.HostingEnvironment.IsEnvironment("UAT"))
					{
						builder.AddUserSecrets("11111111-ca28-445f-a259-11111111111");
					}
					if (hostContext.HostingEnvironment.IsEnvironment("DEVELOPMENT"))
					{
						builder.AddUserSecrets("22222222-ca28-445f-a259-22222222222");
					}
				}
			)
			.Build()
			.Run();
	}

Step 4: To help you debug, add this code to your startup.cs

public class Startup
{
    public Startup(IConfiguration configuration)
    {
        Configuration = configuration;

        foreach (var c in Configuration.AsEnumerable())
        {
	        Console.WriteLine(c.Key + " = " + c.Value);
        }
    }
.......

Visual Studio Code: Trouble Shooting npm package issues in Angular and ASP.NET Core

Over the years I’ve learned a few tips and tricks using Visual Studio code, NPM packages and Angular.

Something has gone wrong. Wierdness is everywhere in your pacakges. Take these steps

Open up the terminal by pressing CTRL+` in VS Code

Try #1: Delete the node_modules folder

rm node_modules

There might be corrupted packages, removing them all may help. Once done, install the packages again:

npm install

Try #2: Delete the pacakge-lock.json file

This file has much more details about the install than the simple packages.json has. The versions of the packages there might be slightly different than what you think.

Install the packages again

npm install

Try #3: Install the latest stable NPM build.

https://phoenixnap.com/kb/install-node-js-npm-on-windows

Try #4: Install the latest Angular

Make sure you are running the latest bits.

npm i g  --save-dev @angular/cli@latest  -force

Once installed, check what version of Angular you have.

ng version

Try #5 Delete the ‘.cache’ folder

In your Angular workspace, delete that folder and rebuild

Try #6 Verify the tsconfig.json folder

In a new folder create a new blank Angular project, then open the workspace it creates and check that tsconfig.json with yours. Make sure there aren’t any big differences.

Best of luck!

Heart Beating CSS Animation on an #Angular Splash Screen. Hosted in #ASP.NET Core.

Applying a Heart Beating animation to a logo in your Angular splash screen involves a few simple tricks. We will use the CSS Animation and transform functions to achieve this.

In the <HEAD> of your Index.html page, we’ll add the CSS. We want it to be available fast so we won’t include this in an external CSS file.

Step 1: Create the CSS Keyframes for a heartbeat:

    @keyframes animateHeart {
      0% {transform: scale(0.8);}
      5% {transform: scale(0.9);}
      10% {transform: scale(0.8);}
      15% {transform: scale(1);}
      50% {transform: scale(0.8);}
      100% {transform: scale(0.8);}
    }

The keyframe keyword indicates what to do in an animation loop. To simulate a heat beating, the size of the image will go up and down roughly matching a human heart.

Step 2: Looping it forever

No one wants to die, not even a heartbeat animation so the animation is set to animate forever. We attach this animation to the ID of the <img>

   #pulseLogo {
      animation: animateHeart 1.2s infinite;
    }

Step 3: Connect the IMG to the ANIMATION

<img id="pulseLogo" src="/assets/logo350.png" width="352" height="41">

Have a look at the CSS animation running: https://wdf-fulfillment-angular-uat.azurewebsites.net/login

#Asp.Net Core and #SwaggerUI: Customizing the Header UI to add links

In our API we needed to be able to add links to external content on the Swagger page. In this article, we will go over how this can be done using SwaggerGenOptions.

In your Startup.cs file go to the ConfigureServices method. Add this after your existing Swagger code.

services.ConfigureOptions<ConfigureSwaggerOptions>();

Next, we need to create this class that will configure Swagger:

public class ConfigureSwaggerOptions : IConfigureNamedOptions<SwaggerGenOptions>
{
	private readonly IConfiguration _configuration;
	private readonly IApiVersionDescriptionProvider _provider;

	public ConfigureSwaggerOptions(IApiVersionDescriptionProvider provider, IConfiguration configuration)
	{
		this._provider = provider;
		_configuration = configuration;
	}

	public void Configure(SwaggerGenOptions options)
	{
	}

	public void Configure(string name, SwaggerGenOptions options)
	{
		Configure(options);
	}

	private OpenApiInfo CreateVersionInfo(ApiVersionDescription description)
	{
		var info = new OpenApiInfo
		{
			Title = _configuration.GetSection("Options:Title").Value,
			Version = description.ApiVersion.ToString(),
			Description =
				"<a target=\"_blank\" href='https://yourwebsite.com'>Detailed Documentation</a>"
		};
		return info;
	}
}

The last method, private OpenApiInfo, handles changing the title, version, and description. It’s in the description where we can add the link and other text.

Asp.Net Core & Kendo Angular: Disabling Grid Checkboxes

The Kendo Grid allows you to display a check box beside every row, and one in the header for Select-all.

Sometimes, however, you need to disable them to indicate they shouldn’t be checked, or perhaps they are read-only. Using a simple CSS class you can do this:

Step 1: Enable CheckBoxes in the Kendo Grid

			<kendo-grid
				[data]="gridView"
				[kendoGridSelectBy]="'myRowId'"
				[(selectedKeys)]="selectedKeys"
			>

You’ll need the ID field of the object this grid is bound to, in our case myRowId, and a simple array of string called selectedKey

Step 2: Add the checkbox column

<kendo-grid-checkbox-column [showSelectAll]="true">
</kendo-grid-checkbox-column>

Now your grid will have check boxes, similar to what you see here:

Step 3: Add the CSS

<kendo-grid-checkbox-column 
[showSelectAll]="true"
class="k-state-disabled" 
[headerClass]="{'k-state-disabled': true}" >
</kendo-grid-checkbox-column>

Bonus:

To change this into a dynamic enable/disable, use this directive:

[ngClass]="{'k-state-disabled': someValue===true}"

Asp.Net Core & Angular: Pressing Enter on a Password box should submit the form

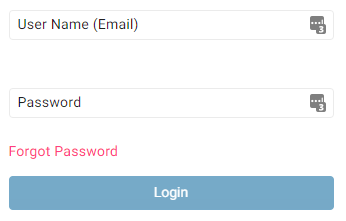
Being able to press the Enter key on a Password text box is one of the most common, but not always implemented features of a login screen.

In Angular, this is a simple two-step process.

Step 1: Hooking up the Keypress event

                    <input placeholder="Password" 
                           formControlName="password"
                           required
                           type="password"
                           (keyup)="passwordKeyup($event)"
                           autocomplete="current-password" />

(keyup)=”passwordKeyup($event)” will call the component on every key typed.

Step 2: Controller function

	passwordKeyup(event: any) {
		if (event.keyCode === 13) {
			//Do the login here
		}
	}

Extras:

autocomplete=”current-password” This tells the browser that you want it to use the current password that it has stored for the site.

Asp.Net Core 6: Throttling Calls to SMTP Mail servers

Some SMTP servers, especially in shared hosting environments, will limit or block email send requests if too many come in at once. In this article, we’ll go over how to self-throttle calls using a simple SemaphoreSlim.

In your Asp.Net Core 6 program.cs you may have a simple endpoint like this to accept mail to send:

app.MapPost("/send", async (EmailTemplate email) => { ..... }

Don’t put your SMTP call here, rather, add that to a service like the below NotificationService:

public class NotificationService {
 private static SemaphoreSlim throttler=new SemaphoreSlim(1, 1);

 try
 {
	await throttler.WaitAsync();
	return await SendSmtp(email, fromEmail, smtpServer);
 }
 catch (Exception exception)
 {
       //log the error
 }
 finally
 {
	throttler.Release();
 }
}

Let’s break this down.

First, we create a SemaphoreSlim called throttle and set it to accept only one call at a time

private static SemaphoreSlim throttler=new SemaphoreSlim(1, 1);

Then we call the throttler’s Wait inside the try-catch and release it

This simple pattern will ensure that your calls to an SMTP service are throttled and queued.

Asp.Net Core 6: Paging enhancements with Linq Chunks in C# 10

Let’s say you have a Grid in your UI, like this one from Kendo which is awesome, and you want to display 1 million rows. Obviously, you’ll need to page the data as requested. This article will go over a new strategy using LINQ Chunks in C# 10.

In your Controller, let’s assume you are passing the page and page size you’d like:

public async Task<ActionResult<List<Cat>>> GetCats(int pageNumber, int pageSize)
{
        
}

Let’s now assume you have a data structure already available:

public async Task<ActionResult<List<Cat>>> GetCats(int pageNumber, int pageSize)
{
       var cats = await GetAllCats();
       return Ok(cats);   
}

We need to page the cats list, here’s the LINQ Chunks:

{
       var cats = await GetAllCats();
       return Ok(cats.Chunck(pageSize)[pageNumber]);   
}

This will return the pageNumber’th page of the page size. Of course, you’ll want to check indexes.

Visual Studio Code running #Angular scripts/tasks when workspace opens

Our application is evergreen, so we always run the latest Angular CLI. We wanted to install the latest CLI whenever the workspace opens.

This will be done with a VSCode Task and a simple Windows CMD batch file.

Step 1: Create a VSCode Task to run the Windows CMD batch file.

In the .vscode folder of the root of the workspace, open the tasks.json file.

Step 2: Add this script

		{
			"label": "Update Angular CLI Folder Startup",
			"type": "shell",
			"windows": {
				"command": ".\\startup.cmd"
			},

			"presentation": {
				"echo": false,
				"reveal": "silent",
				"focus": false,
				"panel": "shared",
				"showReuseMessage": false,
				"clear": true,
				"close": true
			},
			"runOptions": { "runOn": "folderOpen" }
		}

This will run, in the background, the script startup.cmd.

Step 3: Create the startup.cmd

Create a text file in the root of the Workspace called startup.cmd and put this in:

 
cd .\YourProject\ClientApp    //This is the path to the Angular root in your Workspace


Now when you restart VSCode, this script will run in the background every time.